- Hidden Levers AI
- Posts
- 6 Automations (Zaps) Every Creator Needs
6 Automations (Zaps) Every Creator Needs
Mike Cardona
March 21, 2024 • Estimated Reading Time: 9 minutes
I've been automating with tools like Zapier for seven years, both during my time running an automation agency and personal work. And now as I build automations for my community and newsletter.
And one of the most common questions I get is, “what do I automate?”
Today, I'll be sharing 6 of the highest time-saving and ROI-generating Zaps every creator should have.
So you can spend your energy cranking out killer content like a well-oiled machine.
Let's begin…
Note: You'll notice I use Airtable in most of these Zaps.
Don't worry if you use another tool.
You can replace it with your tool of choice, like Notion or Sheets, to build the Zap for your liking.
Zap #1: Automatically Generate Google Drive Folders and Docs for New Posts

Before having this automation, my Google Drive was a mess.
"Untitled" docs scattered and time-consuming to organize.
Plus, whenever I wanted to create a new post, I had to manually create folders for every single one.
This Zap takes care of it.
Every time you add a new post idea to your Airtable base, this automation will create a corresponding folder and doc in Google Drive.
It'll even update your Airtable record with links to the new folder and doc.

Prerequisites:
Airtable account
Google Drive account
Zapier account
Step-by-step guide:
Set up your Airtable base with a table to store your post ideas and a checkbox field to trigger the automation.
Create a new Zap in Zapier and choose Airtable as the trigger app. Select "New Record" as the trigger event.
Choose the Airtable base and table you set up in step 1. Set the trigger to fire when a new record is created and the checkbox field is checked.
Add a Google Drive action to create a new folder for your post. Use the post title and ID from Airtable to name the folder.
Add another Google Drive action to create subfolders within the main post folder (e.g., "Drafts and Revisions," "SEO," "Image Assets").
Add a Google Drive action to create a new Google Doc from a template inside the main post folder.
Finally, add an Airtable action to update the original record with links to the newly created folders and doc.
Test your Zap and turn it on!
Benefits:
Saves time on manual folder and doc creation
Keeps your post ideas organized and accessible
Makes it easy to start writing your post right away
Zap #2: Generate DALL-E 3 Images for Content

How many times have you used DALL-E to create images but then forgotten which prompt you used? Or search your computer to find the image?
Let this Zap handle it for you.
With this Zap, you can create and manage your DALL-E images right from your content database (such as Airtable or Notion).
Just enter a prompt, and voila - a shiny new image appears in your Google Drive and content database (e.g. Airtable).
Benefits:
Saves time on image creation and sourcing
Compresses your images so your site stays fast
Keeps all your images and prompts organized in one place

Grab the Airtable database template (FREE) here
Prerequisites:
Airtable account
Google Drive account
Zapier account
DALL-E API key
Step-by-step guide:
Set up your Airtable base with a table to store your image prompts and a status field to trigger the automation.
Create a new Zap in Zapier and choose Airtable as the trigger app. Select "New Record" as the trigger event.
Choose the Airtable base and table you set up in step 1. Set the trigger to fire when a new record is created and the status field is set to "Generate Images."
Add a DALL-E action to generate an image based on the prompt from your Airtable record.
Add a Google Drive action to find or create a folder to store the generated image.
Add another Google Drive action to upload the generated image to the folder.
Finally, add an Airtable action to update the original record with the image URL and Google Drive link.
Test your Zap and turn it on!
Zap #3: Save Zoom Meeting Uploads to YouTube

Zoom recordings eating up your storage space and your budget? Let this Zap take care of that.
This Zap automatically uploads your Zoom recordings to YouTube as unlisted (private) video.
Benefits:
Saves $480 / yr on Zoom storage costs
Makes recordings easily accessible and shareable
Eliminates the need for manual uploading
Tip: Set up a scheduled Zap (automation) that deletes the recordings from Google Drive so it doesn't eat up space.
Note: If you're wondering why not upload it to YouTube directly? Unfortunately, you can't upload Zoom recordings directly to YouTube. So, you can upload it to your Google Drive to bypass this issue.
Prerequisites:
Zoom account with recording enabled
Google Drive account
YouTube account
Zapier account
Step-by-step guide:
Create a new Zap in Zapier and choose Zoom as the trigger app. Select "New Recording" as the trigger event.
Choose the Zoom account you want to use and set the trigger to fire when a new recording is available.
Add a Google Drive action to upload the Zoom recording to a specific folder. Use the meeting topic and date/time to name the file.
Add a YouTube action to upload the video from Google Drive to your YouTube channel as an unlisted video. Set the video title, description, and privacy settings.
Add a Formatter by Zapier action to format the Zoom recording start time if needed.
Add an Airtable action to create a new record in your database with the Zoom meeting details, Google Drive link, and YouTube video link.
Add a Slack action to notify your team about the new recording and its details.
Test your Zap and turn it on ✅
Zap #4: Automate Weekly/Monthly Check-Ins
Self-reflection is key to staying on track.
But it's easy to let it slip through the cracks.
Not with this Zap in your corner.
You'll get automatic email reminders for your weekly and monthly check-ins. Each email includes a link to an Airtable form so you can review your progress in a snap.

Prerequisites:
Airtable account
Zapier account
Email account

Step-by-step guide:
Set up your Airtable base with a table to store your check-in responses.
Create a new form view in Airtable for your weekly check-in questions.
Create a new Zap in Zapier and choose Schedule by Zapier as the trigger app. Select "Every Week" as the trigger event.
Alternative: Use Airtable native automations to set up the automation. Click here for the step-by-step walkthrough.Set the trigger to fire every Sunday at 6 PM (or your preferred time).
Add an Email by Zapier action to send yourself an email with a link to the Airtable form you created in step 2.
Test your Zap and turn it on!
Benefits:
Ensures you never miss a check-in
Makes self-reflection a regular habit
Provides an easy way to track your progress over time
Check out the step-by-step checklist here. Duplicate the Airtable template and set up those Zaps.
Let's switch gears a bit…
These last 4 Zaps are focused on client-related tasks.
Zap #5: Log Client Calls and Send Resources
One of the most common client-related tasks is logging your calls and sending your client resources.
Depending on your biz the type of resources you send can vary and can be time-consuming, especially if you haven’t streamlined it.
You might find yourself writing a new email, attaching the same resources to your email in Gmail, searching for those files on your computer and then logging the call in your CRM.
It's a lot of work, right?
This automation is here to fix it and make your life easier.
Before you begin…
You'll want to make sure all your client resources are organized and easily accessible in your client database.
Then, create a form that allows you to log the details of your client calls quickly and easily.
During a call, make sure you have the form pulled up and ready to go. This is where you'll log all the important details about the call, such as:
Client name
Date and time of the call
Key points discussed
Resources requested
Action items and next steps
Here's an example of the form you'll use to log client calls and select resources to send:

And here's an example of the email that was automatically sent to "Michael Scott" with the resources selected in the form:
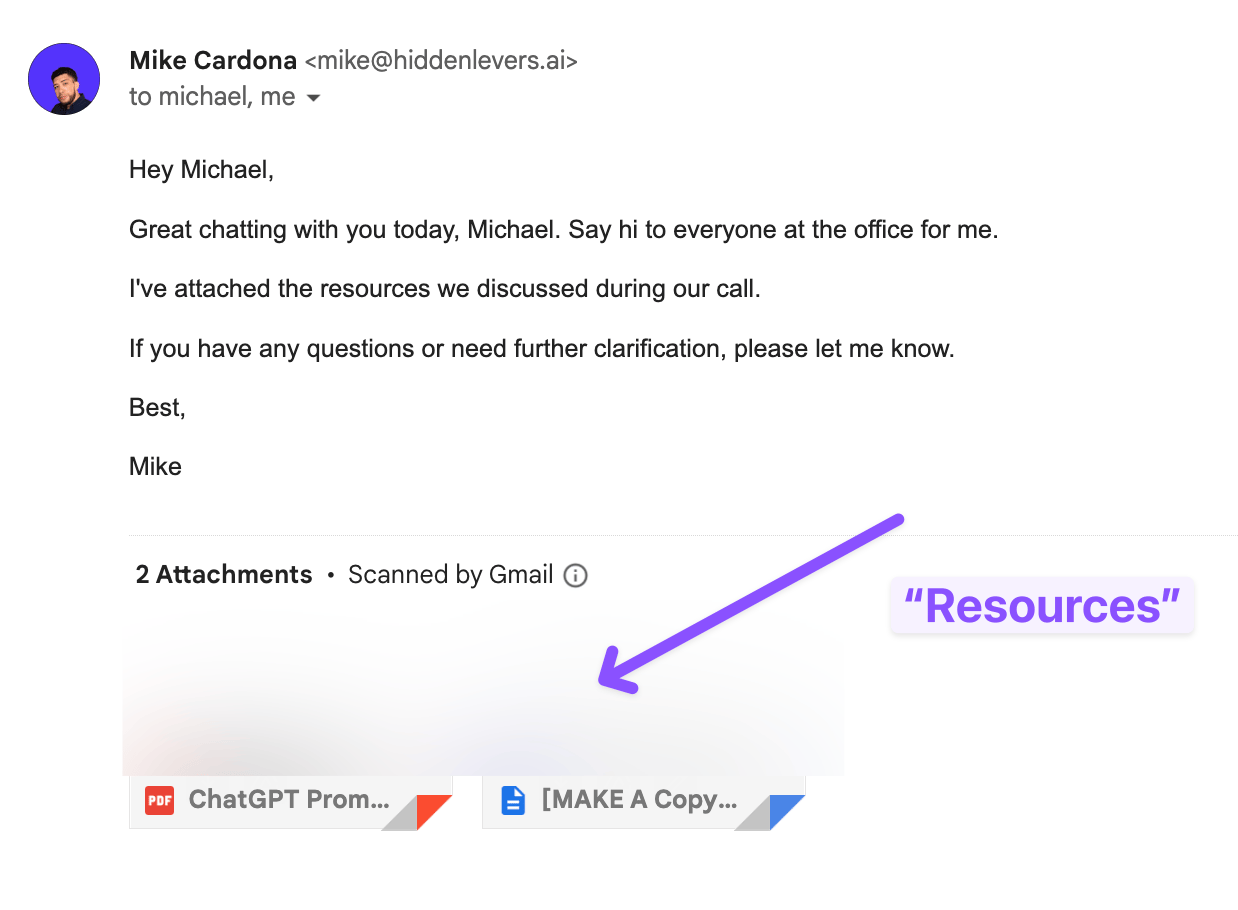
With this automation, you can streamline your client communication and resource sharing, saving yourself time and energy for more important tasks.
Prerequisites:
Airtable account
Gmail account
Google Drive account (to store resources)
Zapier account
Step-by-step guide:
Set up your Airtable base (“Basic CRM”) with a table to store client call notes and a form view to log the calls.
Upload your client resources to Google Drive and add the links to your Airtable base. You can upload the attachments to Airtable too.
Create email templates out of your most repetitive emails and add them to a table in Airtable (e.g. “Email Templates”).
Create a new Zap in Zapier and choose Airtable as the trigger app. Select "New Record" as the trigger event.

Choose the Airtable base and table you set up in step 1. Set the trigger to fire when a new record is submitted through the form view.
Add a Gmail action to send an email to your client with the selected resources from the Airtable form.
Test your Zap and turn it on.
Zap #6: Bypass Calendly Plan Limitations for New Appointments

Want to use Calendly Zapier integration without the price tag?
This Zap's got your back.
By using Gmail's "New Email Matching Search" feature, you can automate actions for new Calendly appointments.
Without needing a paid plan.
Benefits:
Saves money on Calendly subscription
Keeps your Google Calendar and CRM in sync
Automates post-booking tasks and communications
Prerequisites:
Calendly account
Gmail account
Airtable account
Google Calendar
Zoom account (optional)
Slack account (optional)
Zapier account
Step-by-step guide:
Set up your Calendly account with your desired event types and scheduling settings.
Create a new Zap in Zapier and choose Gmail as the trigger app. Select "New Email Matching Search" as the trigger event.
Set up the search criteria to look for emails from "[email protected]" with the subject line starting with "New Event:".
Add a series of actions to extract the necessary information from the email body, such as the invitee's name, email, meeting date/time, and meeting type/length.
Add an Airtable action to find or create a lead in your database using the extracted email address.
Add an Airtable action to update the lead's record with the scheduled meeting information.
(Optional) Add a Zoom action to create a new meeting based on the extracted meeting details.
(Optional) Add a Google Calendar action to update the event with the Zoom meeting link and other relevant information.
(Optional) Add a Slack action to notify your team about the new lead and scheduled meeting.
Test your Zap and turn it on!
There you have it.
6 Zaps that will help you free up your time and mental space.
This allows you to focus on doing more of the things that don't scale, like building relationships.
And the best part?
Each of these Zaps only takes a few minutes to set up.
Try them out and let me know which one was your favorite.
ICYMI 📨
Reverse-Engineer Top Content Into Templates: Create better content, faster.
Collect Feedback and Content Ideas: Get newsletter feedback.
Create Your 90-Day Content Library: Effortlessly generate a wealth of ideas.
Talk soon,
Mike 🧪🔨
Reply